[Git] How to create a repository

♠ Posted by NN TRUNG
Repository (repository) that is where you will store source and one other person can copy (clone) the source code to work. Repository has two types of Local Repository (repository on a single computer) and Remote Repository (repository on a remote server).
In this article, I will guide you how to create local and remote repository repository (using Github) and work with it.

Create local repository

Firstly, to create a repository, you need access to the source directory with the command cd , then use the command git init to initialize the repository in that directory. In this example, I will create a new folder to contain the latter and initialization code repository for it, I would use the git init tên_folder to it automatically starts to create folders.
  $ Git init git_example
 Git repository empty initialized in /home/thachpham/git_example/.git/ 
In the paragraphs above, it displays the message I was initialized empty Git repository in the path as shown above. Note that hidden folders .git/ where it will contain the settings of Git and saved all information about storage, you do not need to touch anything in the directory .git/ this.
If your repository is available on the source then you need to put the files on TRACKED state to be able to work with Git. To do this, you will need to use the command git add tên_file , may use the mark *to fit all. Then use the command git status to see a list of files that were tracked.
  $ Git add readme.txt
 $ Git status
 On branch master 
  Initial commit 
  Changes to be Committed:
  (Use "git rm --cached <file> ..." to unstage) 
  new file: readme.txt 
And after the file has been put into the state tracked and if a file has tracked it must be put into the Staging Area (explained later) and with the command git add , you can proceed Trust ( commit) to save the capture of the change. Structured command will commit git commit -m "Lời nhắn" , this time all the files are in a state tracked (new files) or a file has been tracked, but there is a new change, it will commit.
  $ Git commit -m "First Commit"
 [Master (root-commit) 799db56] First Commit
  1 files changed, 0 insertions (+), 0 deletions (-)
  create mode 100644 readme.txt 
Now that you have completed the first commit files that you've put into the store, I'll say more about the commit in future articles. Bottom line is that here you have a Git source code repository on your machine.

Create a repository on Github and work

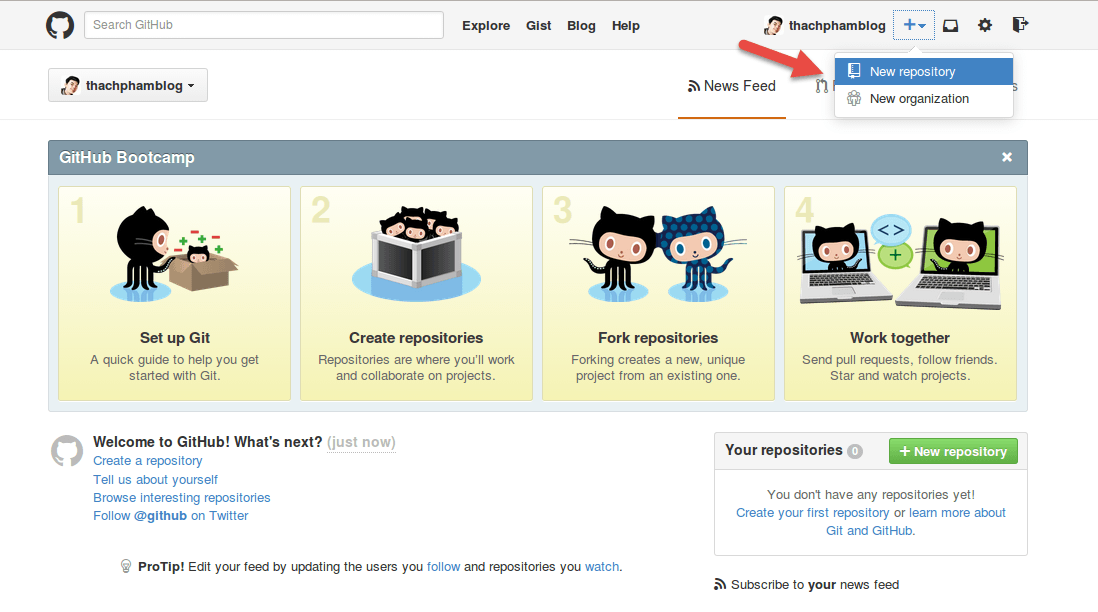
First, you need to log in to Github , then clicking on the + sign on the menu and select New repository.
github-create-repository
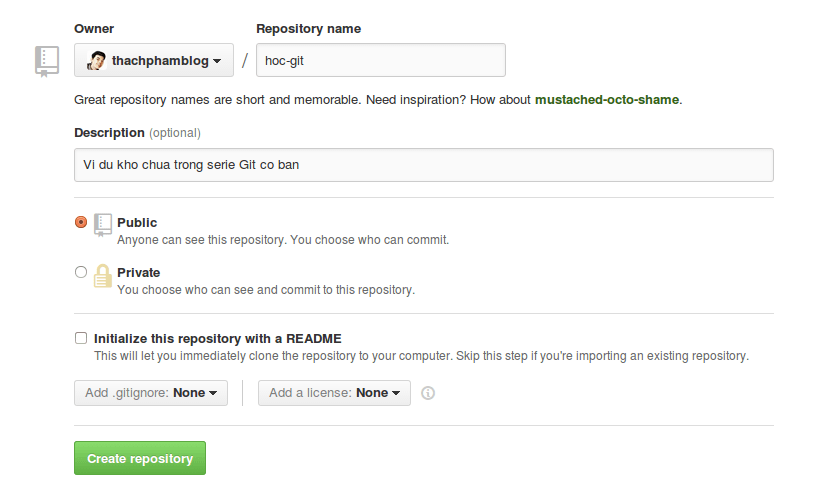
You will need to name your repository. You can select the type of storage is Public (anyone can clone) and Private (only those authorized can clone).
github-create-repository-02
Fill out the information when creating Repository on Github
Once you've created it will lead you to a page to guide work with the newly created repository. And your repository will now address the https://github.com/$user-name/$repository , eghttps://github.com/thachphamblog/hoc-git .
Your job now is to clone the repositories on your machine using the command git clone địa_chỉ .
  $ Git clone https://github.com/thachphamblog/hoc-git
 Cloning Into 'hoc-git' ...
 warning: You vẻ to have cloned an empty repository.
 Checking connectivity ... done 
Now visit the working directory tree (just clone the repository folder on) and try to create a file namedREADME.md, then use the command git add to put the files into the Staging Area.
  $ Cd hoc-git
 $ Echo "Git co Huong dan ban"> README.md
 $ Git add README.md
 $ Git commit -m "First commit on Github"
 [Master (root-commit) 6e729a4] First commit on Github
  1 files changed, 1 insertion (+)
  create mode 100644 README.md 
However after the commit is finished, the file was still unable to commit will appear on Github repository that you have to do one more thing that is taking command git push to push the file has been commit to Github. Note that you will need to enter the account and password Github.
  $ Git push origin master 
  Counting objects: 3, done.
 Writing objects: 100% (3/3), 244 bytes | 0 bytes / s, done.
 Total 3 (delta 0), reused 0 (delta 0)
 To https://github.com/thachphamblog/hoc-git
  * [New branch] master -> master 
origin means the name of the remote (see later) and master 's branch name, these two I will explain in more detail in its own article. Now you can check your repository on Github already.
github-create-repository-03
Result after the source code was commit push up Github
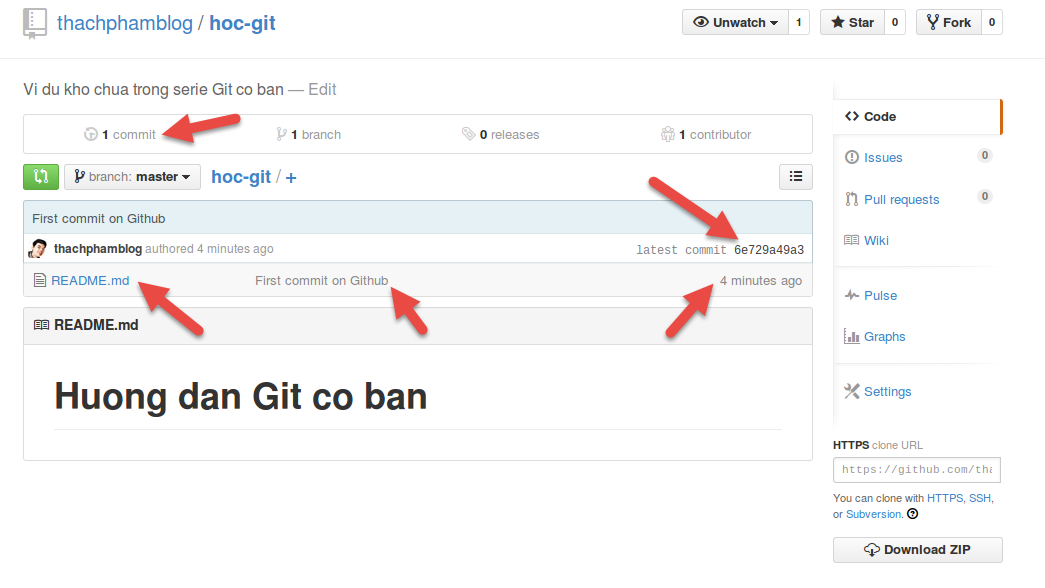
Maybe you'll see whenever push on Github, it will display a notice too wordy, you can give away hidden messages that only display the report on Github username and password, you can set with this command .
  git config push.default simple --global 
However if you do not like being asked for a password again, you can use SSH to Github, I would say this one later.

Epilogue

Now you know how to create a Git repository for now? It's simple is not it, now to continue the post after easier, be practical to create a file on your computer and reposity commit, or you can use Github to prefer putting their code into the repository for handy offline.

[Git] Mark commit with Tag

♠ Posted by NN TRUNG
While you commit your edits, then everything will be all up in her log that showed you how to viewcommit log in the previous section . But if you commit too much, it will cause problems for you later if you need to review information before you commit can tag marker (tag) for each commit and when to see you simply use the command git show tên_tag was made ​​very clear information, in addition it also helps you to easily diff (compare) later when without memory checksum (though just remember the first few letters) of each commit but just remember tag, and can add the tag to your branch from the convenience of the branch.

Lightweight Tag and Annotated Tag

In Git there are two main types of tag are:
  • Lightweight Tag: The tag is merely a snapshot of the commit mark.
  • Annotated Tag: With this tag, you can put the tag titles, and while watching it would have information about the tag, date tag, ....

How to create Lightweight Tag

First, you can type git tag to see a list of tags in your project. Then to create a tag, you can typegit tag tên_tag to create. Eg v1.0 example.
  $ Git tag v1.0
 $ Git tag
 v1.0 
Now you can view the information of tagged commit by running git show tên_tag . Note that it will mark the command on your last commit to the tag v1.0 .
  $ Git show v1.0
 commit 05193375f7a7c1295fd26c6388d81e188f405b0b
 Author: Thach Pham <contact@thachpham.com>
 Date: Thu Apr 23 02:20:50 2015 -0700

  Added a new tag

 diff --git a / tag.html b / tag.html
 100644 new mode file
 Index 0000000..e69de29 

How to create Annotated Tag

To create Annotated Tag, you also use git tag but will have more parameters -a and parameter -m to set the message for this tag.
  $ Git tag -a v1.0-an -m "Launches Version 1.0"
 $ Git show v1.0-Security
 tag-Security v1.0
 Tagger: Thach Pham <contact@thachpham.com>
 Date: Thu Apr 23 02:41:11 2015 -0700

 Launches Version 1.0

 commit d5a599e3385a8fc7a65958ed50bc8b54666b45ad
 Author: Thach Pham <contact@thachpham.com>
 Date: Thu Apr 23 02:40:31 2015 -0700

  Commit for Annotated Tag

 diff --git a / tag.html b / tag.html
 e69de29..fea03c1 index 100644
 --- A / tag.html
 +++ B / tag.html
 @@@@-0.0 +1
 + Annotated Tag 
You can see when you show up, the Annotated tag will have much more information than the tag is normal, and this is also the type of tag you should use to get more information.

Add tag for the old commit

In command on the tag you just created for your last commit. And if you have a lot of previous commit that need tagging, just add the code checksum (or a code checksum) of that commit.
To view the checksum of the previous commit, you can use git log parameter --pretty worth oneline to filter log offline.
  $ Git log --pretty = oneline
 Commit for Annotated d5a599e3385a8fc7a65958ed50bc8b54666b45ad Tag
 Added a new tag 05193375f7a7c1295fd26c6388d81e188f405b0b
 Added 435f642f951fbab1037fc2feef239ab26d6e6115 faq.html
 Initial commit 6904d5232bf90821068279311e205e3e1ff929f1 
And now you can put the tag to commit Initial commit will declare its checksum code in commandgit tag as follows.
  $ Git tag -a v0.0 6904d -m "Tag for inintial commit"
 $ Git tag
 v0.0
 v1.0
 v1.0-Security 

Push Tag

Default command git push will not push the tag made ​​up repository that you can use thegit push --tags to push the tag onto the entire repository.
  $ Git push --tags
 Username for 'https://github.com': thachphamblog
 Password for 'https: //thachphamblog@github.com': 
 Counting objects: 7, done.
 Delta compression using up to 4 threads.
 Compressing objects: 100% (6/6), done.
 Writing objects: 100% (7/7), 775 bytes | 0 bytes / s, done.
 Total 7 (delta 1), reused 0 (delta 0)
 To https://github.com/thachphamblog/hoc-git.git
  * [New tag] v0.0 -> v0.0
  * [New tag] v1.0 -> v1.0
  * [New tag] v1.0-Security -> v1.0-Security 
If you use Github or similar services are now you will see the tag appears in the repository.
git-tag-github

Enter tags to branch

Although in later post I will explain through temporary branch but now you can understand the branch is a fork in a tree project for you edit the source code without affecting the original branch (master).
Now you can access the data you commit through the tag attached to creating a new branch with the command git checkout -b tên_branch tên_tag . For example you want put the tag v1.0-an on a new branch name version1 will write as follows:
  $ Git checkout -b-Security v1.0 version1
 Switched to a new branch 'version1' 
Now that you have automatically transferred via branch version1 rather than master the original, together with data that commits tagged v1.0-an .
Now if you want to work more with this branch is just like when you work in master . To switch back to the master, you type the command git checkout master .
To push this branch up so you can use the command git push origin version1 . If you forget, I repeat then, origin is the name of the remote address that Git repository default character set when you clone.
git-push-branch
Now you try to see what the master version1 and have seen different view of him? In his speech on the branch will explain to you in more detail. The categories that you create a different division to modify its own code without affecting the main code.

Epilogue

In this article, do you see the power of Git is how and when it combines with the branch it will be great in the distribution of the source code to your branch for more flexible working, easily switch between version without doing much. Do not worry if not understand the branch, I will explain shortly in the following section.