♠ Posted by NN TRUNG at 18:11
While working with Git, you are familiar with editing source code, then commit when done editing and push up the remote repository if necessary. But now I have an example that I want to pose a test version with source code is working in the current working tree without affecting the existing code. So how? Probably not clone a repository from the working key and then modify the current tree or star? How is the public loss, which was not optimal and can not synchronize or very difficult to synchronize.
But in Git, we will use a different approach better, easier-called bifurcation (branching), namely that branched something? It is branching in the current working tree you are working there, and every branch we will call it a branch.
Branch in Git is what?
As a starting point to create a repository or clone a repository, you will have a branch (branch), the name is the
master (you can understand what the master is a trunk). This is the branch that will contain all the main source code repository.
That is why, in the part before we push or pull or do some other job parameters to
master in command, that means we're doing operations on branch master .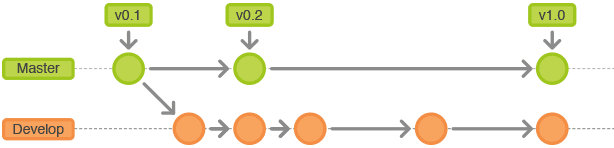
Now if you want to make a change that can be directly used on a working tree or commit, push up the repository without affecting the master branch will need to create a new branch named
develop such.And since then every time you execute certain branch checkout at the source code on your working tree will be exchanged for the branch environment is checkout.
Time alone take a simple example, the branch
master you create a file and then commits master.html up, this time via the branch when you develop (that was created previously) then the file will not have the other master.html because it was commit by branch master , unrelated to develop . Similarly, the change of party you develop will not affect the master both. This is an interesting interaction it directly on your computer, for example index.html file of the master with other content and index.html parties developwhen you use the checkout command on the computer contents corresponding change it themselves, which is why you can test multiple versions on your computer without having to change the folder, just checkout the branch.
Interpretation is a bit wordy, just as a specific example for understandable offline.
HEAD - the cursor position
Before speaking to the branch, I would say a little about
HEAD . In Git, keyword HEAD will symbolize the cursor shows you know what you're located. Now let's review the tutorial commit their reading log, looking to optimize part and inserted into log. Then type lg git, you'll find keyword HEAD tell you where you are in working tree.
As the image above, it means you're in the branch
master .
There's also another way to check that is to read the file
.git/HEAD$ Cat .git / HEAD ref: refs / heads / master
How to create a branch
First you can see all of the branch where you are in the working tree with the command
git branch .Then if we want to create a branch, just type the command git branch tên_brand . For example we need to create the branch develop . $ Git branch develop
Now you can type the command
git branch again to see will see brand name appeared develop.Checkout a branch
Checkout here means you access checking the code in that branch to work there. To do this, you use the command
git checkout tên_branch .$ Git checkout develop Switched to branch 'develop'
Now that you have converted to branch
develop it, be sure to check you can type commands check HEAD above.
Now you will work in the new branch transfer or rather as you are working at the place where the HEAD is pointing to. To switch back to the main branch, type
git checkout master .
Now you try to create a certain file, then commit in the branch
develop master branch and then move on to see what you have done in the branch develop completely meaningless in master . Below are examples of in branch master no file is generated from branch develop.html develop .$ Touch develop.html $ Git add. $ Git commit -m "Commit develop.html develop from branch ' [Develop 8c68896] Commit develop.html develop from branch 1 files changed, 0 insertions (+), 0 deletions (-) create mode 100644 develop.html $ Git checkout master Switched to branch 'master' Your branch is ahead of 'thach / master' by 3 commits. (Use "git push" to publish local của commits) $ Ls faq.html README.md tag.html version1.txt
Similarly with the correct file or any other work it also applies only change in the branch you're pointing.
Data pooled from a branch
If each separate branch it is so then you want to use a change in a certain branch to master, why? Well, we can use git merge command to move data from a certain branch of the branch where you are pointing.Note that in the branch should have been moved to commit. For example you need to transfer data from the master branch will develop in turn the following commands:
  $ Git checkout master
 Already on 'master'
 Your branch is ahead of 'thach / master' by 3 commits.
  (Use "git push" to publish local của commits)
 $ Git merge develop
 Updating 83e9976..8c68896
 Fast-forward
  develop.html | 0
  1 files changed, 0 insertions (+), 0 deletions (-)
  create mode 100644 develop.html
 $ Ls
 faq.html README.md develop.html tag.html version1.txt
Delete branch
If you do not need to use any other branch may be deleted with git branch -d command ten_branch. Note that the branch you want to delete the data to be included (merge) of the master.
  $ Git branch -d develop
 Deleted branch develop (was 8c68896).
After deleting is complete, it will report that the branch had been hooked up to commit to any code checksum (8c68896).
Working with remote branch
Go back a little with all the remote repository, now you add a new remote address and name https://github.com/csswizardry/inuit.css this remote Inuit in your working tree.
  $ Git remote add Inuit https://github.com/csswizardry/inuit.css
 $ Git remote -v
 Inuit https://github.com/csswizardry/inuit.css (fetch)
 Inuit https://github.com/csswizardry/inuit.css (push)
 thach https://github.com/thachphamblog/hoc-git.git (fetch)
 thach https://github.com/thachphamblog/hoc-git.git (push)
Now you can see the entire remote branch of the
inuit newly added by commandgit remote show inuit .$ Git remote show Inuit * Remote Inuit Fetch URL: https://github.com/csswizardry/inuit.css Push URL: https://github.com/csswizardry/inuit.css HEAD branch: master Remote branches: feature / docs new (next store will fetch in remotes / Inuit) feature / new grids (next store will fetch in remotes / Inuit) fix / beautons new (next store will fetch in remotes / Inuit) fix / new grids (next store will fetch in remotes / Inuit) gh-pages new (next store will fetch in remotes / Inuit) incoming new (next store will fetch in remotes / Inuit) master new (next store will fetch in remotes / Inuit) new v5.0.1 (next store will fetch in remotes / Inuit) new v5.1 (next store will fetch in remotes / Inuit) new v5.1.0 (next store will fetch in remotes / Inuit)
Now you can choose a remote branche to fetch data. For example, now I'll create a new branch for your working tree named
fix_ui , and then load the data in branch gh-pages of inuit , I'll turn to do the following.$ Git branch fix_ui $ Git checkout fix_ui Switched to branch 'fix_ui' $ Git pull Inuit gh-pages warning: no common commits remote: Counting objects: 309, done. remote: Compressing objects: 100% (33/33), done. remote: Total 309 (delta 4), reused 2 (delta 2), pack-reused 274 Receiving objects: 100% (309/309), 135.63 KiB | 0 bytes / s, done. Resolving deltas: 100% (106/106), done. From https://github.com/csswizardry/inuit.css * Gh-pages branch -> FETCH_HEAD * [New branch] gh-pages -> Inuit / gh-pages Auto-merging README.md CONFLICT (add / add): Merge Conflict in README.md Automatic merge failed; fix conflicts and then commit the result.
Maybe it will happen when the gross error Conflict README.md files is not very important as well, so you can skip by typing
git add README.md to track this file, because now if you type the command ls that it has Inuit have the files from it.
Now you can commit it and try to push it up your repository.
  $ Git commit -m "Commit from fix_ui"
  [Fix_ui c1eb301] Commit from fix_ui
  $ Git push thach fix_ui
  Username for 'https://github.com': thachphamblog
  Password for 'https: //thachphamblog@github.com':
  Counting objects: 317, done.
  Delta compression using up to 4 threads.
  Compressing objects: 100% (201/201), done.
  Writing objects: 100% (317/317), 135.77 KiB | 0 bytes / s, done.
  Total 317 (113 delta), reused 304 (delta 106)
  To https://github.com/thachphamblog/hoc-git.git
  * [New branch] fix_ui -> fix_ui
Recalling that,
thach remote name of the repository means that you need to push up and fix_ui need to push their branch name. And here are the results after the push up its repository.
And of course, you can also through a different branch and use the command
git merge to consolidate this branch of the data.
In addition, knowledge of the technical branch also has a fairly interesting too that the work group might need to, which is rebase branch with the purpose of the swap positions commit. But here is the basic series, so I will not say by when you just need to use the expertise of the techniques I have listed here is.
Epilogue
So here I've finished the tutorial ends best technique you whatever Git using Git for any purpose must also use. I also had the most thorough guide to understand his way towards his easiest so hope you can understand it. Continue in future articles, I will not go over the techniques in Git again they will introduce you to some server services Git repository for the best and especially with free packages for you to add multiple choice.

0 nhận xét:
Đăng nhận xét